Tuesday, July 27, 2010

Adios PB, you won't be missed & Chocolate Galore III (Chocolate Cheese Cake)

As letters popping into this page forming words and sentences, my excitement is overwelming! I was told that Psycho Bitch (PB) is leaving! Yes, leaving the school for good!! Well, you might wonder if the screaming matches previously had to do with anything. Honestly, I don't care as long as the news is true and I don't get to see the face of thunder ever again. *fingers crossed* For unknown reasons, she is not coming back from next week onwards to spread her negative energies. Apparently, I was not the only one who is not liking her. The school manager mentioned that "She has no direction in her life"...his words not mine. The supervisor chef started to make fun of her outbursts....mimicking her which I happily laughed along. Ryan said he believes that she got issues at home.
A happy normal person won't have such outbursts. Couple of months ago, when PB brought her husband and daughter to our school "open day", I noticed they hardly talked to each other. The husband was looking bored, ignored the daughter and was on the phone the whole time we were there...And then, all the screamings and outbursts - not from someone who is leading a healthy mental life. However, I just thought she's scare of the upcoming practical and theory exams. Why would a housewife wanted to go through all that exam stress?!! I know it is not nice to judge but who said that I am a nice person anyway...LOL!!! So, in the end everything will be great as long as the news is true!

Chocolate Cheese Cake (in hazelnut crust)
This is my first cheese cake and it is a very nice one! Set oven temperature at 160 degrees C.

Cream Cheese.................................300g
Sugar.................................................75g
Orange rind.......................................1 no or 1/2 no
Lemon rind........................................1 no or 1/2 no
Egg....................................................90g
Whipped cream................................30g
Chocolate, melted............................100g
  1. Cream the cheese, sugar, lemon and orange zest in a mixing bowl until fluffy (careful when zesting the orange - avoid the white part of the skin coz it is bitter)
  2. Occasionally scrap the side of the bowl to ensure a smooth mixture.
  3. Slowly add in the eggs (beat a bit to mix the yolk and white together) a little at a time. Mix well.
  4. Melt  chocolate over bain-marie. Add in the warm melted chocolate.
  5. In a separate mixing bowl, whisk the whip cream until soft peak.
  6. Once the cheese mixture ready, fold in the whipped cream.
  7. Pour batter into 6" tin with hazelnut crust baked (refer to below).
  8. Fill a larger flat pan with 1" deep water. Bake the cheese cake in this. This control the moisture in the oven so the cheese cake will not crack.
Hazelnut Crust (base)

Blended hazelnut, roasted..................................45g
Cake Flour...........................................................38g
Sugar....................................................................38g
Butter, softened...................................................55g
Egg.......................................................................13g
  1. Combine everything in a mixing bowl. Mix well.
  2. Spread evenly in a 6" cake tin lined with baking sheet.
  3. Bake until golden brown at 160 degree C.
  4. Make sure the crust is cool before adding the cheese cake mixture.
*Note: Extra crushed hazelnut can be used to cover the cake sides once fruit glaze (apricot) is applied on the cake top and sides for decoration purpose.

Saturday, July 24, 2010

"Don't Tell Me What To Do!" and Chocolate Galore II (Sachertorte)

I've been taking wide gaps between my posts. Besides the annoying renovation upstair which is STILL ongoing, I've been busy preparing for our wedding in Siem Reap which is only two months away...Well, the boys just had their exams thus taking another 3 weeks break. This week, Ms. Psycho Bitch spreaded her venom again...not to me though. Poor ADD girl got scolded for nothing. Well, this week is my turn at the dishes and both girls are in charged of sweeping and mopping. Pretty simple you might think...Unfortunately, when you have a rotten apple in the bunch things will never be peaceful. Psycho Bitch decided that she won't do much except sweeping a few spots and leave one hour before the class ends. ADD girl is not stupid either...one fine day, she decided to sweep the floor first so Psycho Bitch will have to mop the floor (guess she's tired of Psycho Bitch's little escape trick) Good for her!!! Unfortunately, Psycho Bitch got a few "dead frogs" up her sleeves too...She simply ignored the floor mopping altogether! (told you she's a LAZY bitch!!). After couple of days, ADD girl can't take it anymore so went up to Psycho Bitch and asked her to mop the floor after she swept the kitchen floor.

"Don't tell me what to do!" screamed Psycho Bitch.

Followed by more insults and you can see ADD girl's eyes turned teary. Gosh sake, she's an innocent 17 years old...and you are an adult (probably an antique)...So, as usual...I came to the rescue. I screamed back at her, stated all her wrongdoings, called her "Psycho Bitch" for real and asked her to go just away. ADD girl ran to the toilet and slammed the door. Silly drama..sigh. Well, let's go back to Chocolate Galore II (Sachertorte).

Sachertorte (torte is German word for cake)
This is a classic chocolate cake originated at the Hotel Sacher in Vienna. The original recipe was never revealed but many bakers tried to imitate it and here's one of them:

Set oven temperature at 165 degree C (quantity for 2 x 8" cake tins)

Butter......................................250g (room temp)
Sugar 1..................................250g
Vanilla Essence....................drops
Melted Chocolate.................312g
Egg Yolks..............................250g (room temp)
Egg White.............................375g (room temp)
Sugar 2.................................188g
Salt.........................................2g
Cake Flour.............................250g (sifted)
Apricot Jam...........................as required
  1. Cream Butter, Sugar 1 and vanilla essence until pale and fluffy.
  2. Add egg yolks gradually. Mix well.
  3. Add melted chocolate.
  4. On another mixer, whisk egg white with salt on high speed. Stop, add sugar 2 and whisk on high speed until soft peak (Meringue).
  5. Scrap Batter 1 into a big round bowl. Fold in meringue alternately with the flour. Mix well but not over mix.
  6. Pour into cake tin layered with baking sheet. Bake for 1 hour. Test for doneness with a skewer.
  7. Slice cake top so it will be flat and slice into 2 layers. Spread apricot jam in between.
  8. Mask the top and sides with ganache. Make sure the surface is smooth. Chill.
  9. Get chocolate mirror ready, slight warm and flowy.
  10. Cake on a rack, pour chocolate mirror on the cake edges so the sides were all covered and use a spatula with one straight horizontal swipe smoothen the chocolate mirror on the cake top. Chill.
Ganache
Ganache is a chocolate cream which is very useful for both filling and topping for chocolate based cakes. It can be piped onto cake as decorations as well.
  1. Boil heavy cream (250g) in a saucepan.
  2. Add dark couventure (250g) and stir until all chocolate melted. If too thick, add more cream or milk. Chill until set.
Chocolate Mirror
Chocolate mirror is a chocolate glaze which is smooth and very glossy that gives a mirror like surface. Used it while it is still warm since it will set to room temperature.
  1. Boil 100ml water with 80g sugar and 40g glucose. Sift 30g cocoa powder before adding into the hot liquid. Stir with a whisk until blended.
  2. Melt 80g dark couventure. Add in 40g butter. Remove from heat and stir until blended.
  3. Add (2) into (1). Stir well.

Friday, July 9, 2010

Chocolate Galore I (Brownies)

The last few weeks again were quite uneventful. We got breaks in between which are fine for me but the two boys in our class had a different schedule thus, leaving me with the two girls. Of course, by now you know one of them is the psycho b*tch so the air in the kitchen is not good. Cleaning up is no fun for me since I have to mop and sweep the floor all by myself for one week and clean everyone's dishes all by myself in another! And I bet psycho b*tch purposely use more utensils and leave the dishes extra dirty for me to clean. 

On the other hand, I am surprise by how many people actually love chocolate based products. Personally, I am not a big fan cause since young my mom told me that chocolate gives you constipation! Throughout the last couple of weeks and one week break in between, we made a huge variety of chocolate products. So, instead of putting everything in one entry, I will break them down to a few parts.

Everyone's Favourite Brownies  
Well at least everyone who ate this brownies recipes. For someone who doesn't really like chocolate based products, I really don't mind this brownies. It is very moist and flavoursome! Both brownies I made were gone quickly!
Set temperature at 180 C degrees. Laid a baking sheet on a 7" dia tin. Use a 6" tin for thicker brownies or 8" tin for a thinner one.

D. Couverture.......................................115g (or normal cooking chocolate)
Butter..................................................150g
Egg.....................................................90g
Sugar..................................................130g
Salt.....................................................1g
Vanilla Essence...................................drops
Bread Flour/Cake Flour.........................60g - use bread flour for chewiness and cake flour for softer texture
Walnut (chopped coarse)......................60g
  1. Melt chocolate (if a block/bar, chopped into smaller pieces) and butter over bain-marie. Let it cool. Note: To avoid burning the chocolate, control the heat by adding in small quantity of chocolate progressively and on/off the heat necesserily. Also, watch out the steam from bain-marie not getting into the melted chocolate.
  2. Mix egg, sugar and vanilla together until well blended. Blend in the chocolate mixture.
  3. Sift the flour with salt and fold into the batter.
  4. Fold in the walnuts.
  5. Pour into cake tin and bake for 45 mins until 80% baked (still moist in the centre).

Wednesday, June 23, 2010

A World of Choux, Slackers and One Psycho!!!

I am a bad bloggie! I've been a slacker...Can't believe my last entry was almost one month ago! Well, I have a few good reasons!
  1. We had a Mid Semester test...which I had the highest score! :)
  2. One week of well-deserved break after the test.
  3. Massive renovation right above our apartment (imagine 4 jackhammers going at the same time!!!)
  4. The last two weeks' lessons were BORING!!!
  5. Oh, I got a psycho b*tch who screamed at me again :( Yup, she's not only LAZY...she's PSYCHO too.
So you see, I got very good excuses...Now, lets get on with the last two weeks lessons. The first one was choux pastry (pronounce: SHUz) or more commonly known as Eclair Paste. Commonly used for Cream Puffs and Eclairs. It is French obviously and the recipe is simple. While making the batter is easy, piping it out to make a variety of puffs is not. Items such as cream puffs, eclairs, swans, mini crocombouche, paris brest, fritters and St. Honore were taught. Unfortunately, I find the week lesson was a bit bland.

Choux Pastry (set temp at 200 degree C)

Bread flour/cake flour.....................................95g (for a crispier end product, use bread flour)
Butter..........................................................50g
Water/Milk...................................................125g (milk contributes to golden end product) I prefer 1:1 of water and milk mixture.
Eggs...........................................................3 medium sized
Sugar & salt.................................................A pinch (sugar also contributes to golden end product)
  1. Put the water & milk mixture in a sauce pan with salt, sugar and butter. Over low heat, stir with whisk until all butter melted (careful since boiled milk will overflow). 
  2. Must sieve the flour to avoid any lump. Once the water milk mixture boiling, add all flour and stir with a wooden spoon.
  3. Stir constantly until all flour blended in. This will create a smooth yellowish batter.
  4. Transfer this to a mixing bowl and using a paddle attachment, stir until the batter cools.
  5. Add egg one by one. Before the second egg is added in, make sure that the batter fully absorbs the first egg. Scraping down the bowl after each egg.
  6. After the last egg is added in, the batter should turn smooth and glossy.
  7. Fill the paste in a piping bag and pipe according to desired shapes (cream puff - round and eclair - long).
  8. Bake at least 20 mins without opening the oven door (choux pastry rely 100% on air and heat as raising agents).
Pastry Cream
Pastry cream is a custardy filling used to fill up both cream puffs and eclairs.
Milk........................................500g
Vanilla essence.......................3 drops
Egg yolk.................................100g
Sugar.....................................100g
Corn flour................................50g
Butter.....................................70g
  1. Whisk egg yolk and half of sugar. Add in corn flour and mix until smooth.
  2. Bring milk and other hald of sugar and vanilla essence to the boil (careful, boiling milk will overflow).
  3. Slowly beat in hot milk (half) into the egg yolk mixture. Stir.
  4. Return the egg yolk + hot milk mixture to the remaining hot milk and continue to stir under low heat.
  5. Mixture will start to thicken and turn into cream.
  6. Add butter and continue to stir until all butter melted.
  7. Cover and chill.
  8. Using a piping bag, pipe pastry cream into cream puffs or eclairs.
Note: For decorations, you can always dip the cream puffs or eclairs in melted chocolate or simply dust with icing sugar ;)

Paris Brest
Paris Brest is a doughnut-shaped choux product which is a hit during the annual cycling championship in France whereby cyclists race from Paris to Brest, hence the name. And, the shape is obviously from the bicycle wheel. Initially, I thought it was supposed to spell Paris "Breasts" and that it always come in pair. Of course, this will take Paris Brest to a whole different level. 
  1. Using the same batter, fill up a piping bag with a star nozzle and pipe out desired size circle. Make sure it is about 1 inch thick.
  2. Sprinkle some almond flakes on top. Bake at 200 degrees C.
  3. Once golden, let it cools on a rack. Cut the middle horizontally.
Filling: Using pastry cream, add a big tablespoon of hazelnut paste. Stir well before fill up a piping bag and pipe the filling on the bottom part before sandwich it with the top part.

Mini Crocombouche  
Crocombouche is a cone-shaped towering structure assembled with many cream puffs hold together with caramel and decorated with spun sugar on the top. It is traditionally used as dessert for French wedding. Here, we made a mini version of it.
  1. Pipe cherry-sized choux pastry onto a baking tray. Bake and fill each one up with pastry cream.
  2. Prepare caramel and dip each puff into the caramel and start assemble the cone by creating a circle as the base.
  3. Drizzle caramel over the puffs after every level.
  4. Once completed, prepare spun sugar and make into a ball or ring to decorate the mini crocombouche top.
Note: Extreme care when handling caramel since it is extremely HOT and sticks to your skin!

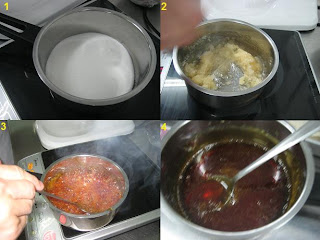
Caramel (burnt sugar)
  1. Put 100g caster sugar in a saucepan and heat it up.
  2. Stir occasionally until all sugar dissolves and turn brown.
  3. Once all sugar melted, it will turn into a golden brown syrup.
  4. Prepare some water and add them into the caramel with extreme cautions!
  5. Stir and the caramel is ready to use.
  6. If the caramel turns too thick, reheat it over medium heat. 
Note: Extreme care when handling caramel since it is extremely HOT and sticks to your skin!
Spun Sugar
Sugar..............................300g
Water.............................150g
Glucose.........................60g
  1. Make a syrup of sugar, water and glucose.
  2. Boil until 160 degree C (130 degree C is when the boiling liquid stop producing steam).
  3. Stop the heat immediately by dipping the whole pot into cold water.
  4. Remove from water and allow to stand 3 mins before spinning them over a rod. A spun sugar apparatus is required but a fork will do the trick fine. 

Friday, May 28, 2010

A land of castle, cookies, tarts and rolls II

It was a week of huffing and puffing. My back was sore and my feet are still numb but the satisfaction of completing all tasks on time worths every minute. I almost die when our chef told us that instead of 5 days to complete our group project, we got only 4 days because today is a public holiday. So here we go, squeezing 5-day work into 4 days.

Scrambled to reschedule our work plan as well as our own time management to complete two castles as well as our own 3 recipes. Again, some were not contributing as much as they should (you know who...) but I don't care because I really want to learn how to make the castles using fondant and pastillage. Here goes one of my motto: "The more I did, the more I learnt". The weasel in me came out when I indirectly managed to 'convince' a lot of my design into the castles without anyone noticing...hehehe. I got everyone to go along with the colour selection, door design and to add mosses and bricks to cover all defects.

In this project, we got to make 2 castles. One is a real cake and the other one is a dummy made from styrofoam. Fondant is a softer material which used to cover real cakes but too soft for other kinds of figure moulding. Hence, it is more palatable. Pastillage on the other hand, is easier to work with but I would not recommend anyone eating it. Here are the recipes for fondant and pastillage (they are cool to use as 'play dough' since it is completely non toxic):

Fondant
Icing Sugar......................................................5kg
Gelatin.............................................................75g
Water...............................................................430ml
Glucose...........................................................600g
Glycerine.........................................................120g
  1. Mix water and gelatin for 10 mins.
  2. Heat over medium fire and stir until gelatin dissolve (do not boil).
  3. Add in glucose and glycerine. Mix well.
  4. Put icing sugar in a mixer and using hook, stir on speed 1.
  5. Add the water mixture gradually. A clay like dough will form.
Pastillage
Icing Sugar......................................................5kg/10kg/1kg
Water...............................................................450ml/900ml/90ml
Gelatin.............................................................50gm/100g/10g
  1. Soak gelatin in water for 10 mins (do not stir).
  2. Heat the mixture (not to boil) wait for the gelatin to dissolve.
  3. Put icing sugar in a mixer and using a hook, stir on speed 1.
  4. Add the water mixture gradually. A clay like dough will form.
Note: Always pack both fondant and pastillage in air tight bags or containers if not using (dry doughs are not usable). Use food colouring for any desired colour (mix in the colour by kneading the dough repeatedly until colour even).


I completed all my 3 recipes right before our project presentation at 1pm. I made some changes on the make up.Here are the pictures:
 
Verdicts: The Walnut Cinnamon Rolls and Chocolate Chip Cookies were hits! They were finished in an hour later. I had to pack some before they were finished. Unfortunately, my almond cream tarts while looked nice were not favoured. I believe I put too much nutmeg powder! HAHAHA...but the pastry shells were excellent!

Sunday, May 23, 2010

How to Make Origami Lotus

After all the puff dough folding workout I did last week, I've decided to try on something less exhausting...to fold a paper lotus! This is my first time doing a proper origami (simple triangle airplane doesn't count)...I realised that it is extremely therapeutic!

Supplies:
  • A4 sized coloured papers...I chose red (2) and green (1)
  • ruler
  • cutter/scissors
  • stout string or thread   
1. Cut 12 pieces of 13.5cm X 7.5cm colored paper rectangles. An A4-sized paper should be precisely enough to make six.

2. For one flower, you need 8 pieces for the petals (red) and 4 pieces for the leaves (green).

3. Petals: Fold the paper pieces in half, parallel to the longest edge. The four corners are folded as if making a boat. Then the two longer edges are folded inwards and the paper is folded in half. Repeat the same steps for all 8 papers (red).
4. Leaves: Folding of the leaves is actually quite similar to folding the petals. Once you've reached the stage illustrated in the photo above, simply fold the two outer edges to the middle. Then fold all 4 papers (green) in the same fashion.
5. With the leaves complete, place the petals on them. One green paper (leaf) to be mounted with two red paper (petal). In the same way, add the remaining petals to the leaves. These four petal-leaf clusters are placed next to each other and held together with string at the center.
6. The flower petal-leaf clusters are folded in eight directions. Begin by folding the flower's first layer. Do this by folding the highest standing paper petals. How high the paper is folded depends on the individual. The flower can be made taller or flatter.
7. Continue folding the petals. Once the first layer is complete, the second layer can be added. With the second layer of petals folded, the leaves can then be folded out.

Puff the Magic Pastry

In the land of Honalee, Puff Pastry may be very well magical since it raises to great volume and even expansion without the help of yeast. However in reality, to my much dismay, it is simply achieved by the folding and rolling techniques and bake over high heat to create a light, crisp surface and  flaky internal structure. A very simple dough to begin with (of flour, butter and cold water), puff pastry is however not as easy as it sounds.

There are 3 types of puff pastry:
  • Full puff - 100% fat of the flour weight
  • 3/4 puff - 75% fat of the flour weight
  • 1/2 puff - 50% fat of the flour weight
Pastry margarine is incorporated into the rested dough via 2 methods: English & French. Pastry margarine is perfect since it has higher melting point so in room temperature, it is still in block form and easy to mold. Meanwhile, to create the puff pastry, set the oven temperature between 200-220 degrees C.

Cake flour/bread flour.............................................500g
Butter........................................................................50g
Salt............................................................................3g (not necessary if salted butter is used)
Cold water................................................................250g

Enclosing:
Pastry Margarine.....................................................375g
  1. Mix the flour and salt in a mixing bowl evenly using a hook.
  2. Add cold water and butter (take control over the water). Once a smooth dough is form, gather it into a smooth ball.
  3. Wrap in plastic and rest for 30mins
  4. There are 2 methods of enclosure (English & French). English method is as follows:
    • roll our the dough into a large rectangle.
    • wrap the 375g margarine in cling film. 
    • soften, flatten and form the pastry margarine into an even square block (2cm thick) covers the bottom 2/3 the size of the dough rectangle.
    • fold down the top so it covers half the margarine.
    • fold the bottom third over the centre and now the butter is now enclosed.
    • using a rolling pin, beat the dough lightly so margarine inside is evenly distributed and roll into a rectangle.
    • before folding, dust off excess flour.
    • fold down the top part to the centre and bottom part to the centre (sides meeting).
    • now it looks like an opened book. Fold in the centre as if closing a book. 
    • rest the dough for 30mins before doing another similar fold.
I shall post some step by step diagrams and pictures soon...